
The proper NC MX-5 battery relocation guide
Written by
What’s there to it??
Interested in relocating your NC’s battery into your boot? I’ve made this guide super simple, without missing out any details. Now relocating your battery as an overall idea sounds incredibly simple right? There’s quite a few things you’ll need to do and take into account when relocating your battery from under the bonnet to the boot. Before we start, I’d like to mention there is only one downside when doing this. That’s, your chosen battery will now be taking up space in your boot. If you’re happy that you can live with that, then let’s get started.
The structure of this article will be as follows. Shortly we’ll dive into what your going to need and why. That’ll be the first page. The next page can be located down at the end of this page, where I’ll go over a step-by-step installation guide. By the end of this article you should be well equipped to tackle this on your own vehicle.
Choosing your battery and mounting hardware
Let’s start at the heart of your car’s electrical system, the battery. Whenever mounting a battery outside the engine compartment, it should always be a sealed AGM type battery. Period. Why’s this incredibly important? Two reasons, first let’s say the worst thing happens… Your in a wreck, the vehicle’s upside down. If you were to re-use the original battery you’ll find mounted under the bonnet, you’re quite likely to have hydrochloric acid leaking out everywhere. Terrible situation. The second reason is an AGM dry-cell battery does not need any venting. A regular car battery will have a tube that is used to vent away hydrogen gas as your battery charges. So to avoid both of them issues we use a dry-cell sealed AGM type battery that can be mounted in the passenger compartment and can also be mounted any orientation, no problem.
What options are on the market then for this? There are an infinite amount of options, entirely dependant how you intend to use the car and your preference over AGM and lithium technology. I’ll briefly discuss AGM (Absorbed Glass Mat) vs conventional flooded batteries then we’ll compare against newer lithium designs.
AGM batteries are common-place in new cars such as BMW, Mercedes, Audi, Mini, Volvo. A few pros of AGM vs a conventional flooded battery are. Maintenance free (no longer topping up with deionised water), higher cold-start figures and most importantly to us. They are totally sealed and are leak and vapour free. Whereas a traditional flooded car battery will need to be kept behind a firewall and have a vent tube for the hydrogen gas that is released when charging and discharging. An AGM battery does not need to be vented and can be safely placed in the passenger compartment. Which the boot is classified as their is no sealed firewall between the boot and the interior. Only a removable bulkhead that is not a firewall. Some AGM battery manufactures are: Yuasa, Oddessey and Optima.
Newer lithium batteries have the obvious advantage that due to using lithium in replacement of lead, their weight is significantly reduced. However they may cost three to four times more. LifePo4 is the latest lithium design, which stands for “lithium Iron phosphate”. Generally speaking lithium batteries don’t work well in really cold climates. Though that doesn’t apply to the vast majority of NC MX-5 owners. They can be discharged to 0% and this will not reduce the lifespan of the battery due to the effect of charging an AGM battery below 50% its capacity (Ah) will heat up the plates and shorten the lifespan prematurely. Something you may be aware of is that lithium batteries can experience a thermal runaway event that are very difficult to extinguish. Due to this safety concern most high-quality lithium batteries have a fire-proof casing to contain the worst case scenario but it is defently worth being aware of. Some LifePo4 battery manufactures are: DeadWeightIndustries and AntiGravity.
When choosing a suitable battery for the NC it is imperative that you select one that has a minimum of 400CCA (Cold cranking amps). Ideally more is better and will not have any negative effect going larger. The starter motor and the small load of the ecu and fuel-injectors, ignition system pull the necessary amount of current (Amps) they require. Going with a larger CCA battery will not mean the starter will spin faster. However as the battery prematurely deteriates you’ll still have more than the minimum amount required to start the engine and you will not be working the battery as hard with some headroom.
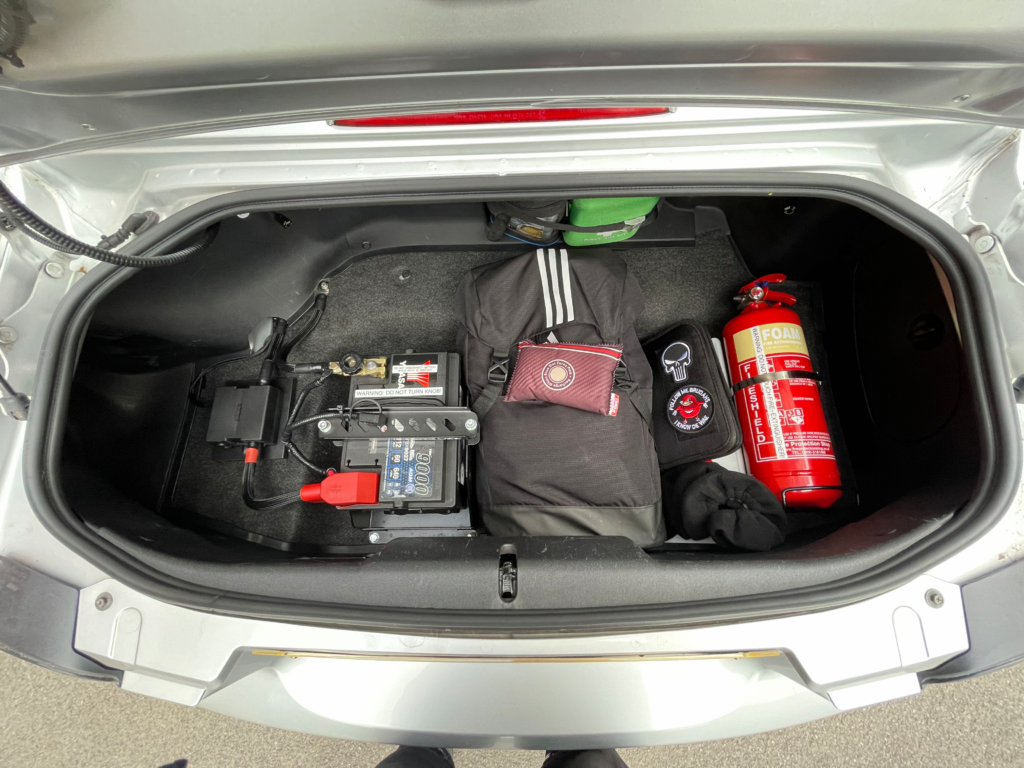
Now you’ve chosen your ideal battery. You’ll need to find the appropriate hardware to mount it securely in the boot of your vehicle. You will find all sorts of enclosures. My personal vehicle has a Motamec standard battery enclosure. If you intend to use common batteries such as an Oddessy PC680 you’ll find many enclosures suited specifically for that battery only. This goes for most batteries. However don’t stress if you can’t find a battery specific enclosure. You will either have to use a standard dimension battery enclosure like my Motamec or you may find other universal dimension enclosures like the two other sizes Motamec offer. The hardware you’ll need to fix your enclosure down to the boot floor must be a minimum of four x M8 8.8 (grade 8) BZP (bright zinc plated steel) hex-bolts with M8 8.8 Nuts and BZP washers. Regardless if you use an AGM or lithium battery they are still heavy items that can easily turn into projectiles if not secured down properly. So stick to that as a baseline.
What parts will I need?
Below will be a list of parts that will have a cost and link where to buy them in UK.
- A suitable AGM or lithium battery. (£100-£400)
- A suitable battery enclosure. (£40-£100)
- Six metres of black 40mm2 OFC welding cable. (£60)
- Five metres of 16.9mm I.D. non-split plastic-conduit (£10)
- MTA power-distribution box (£25)
- Four 200A Megafuse (Three for spares in emergency) (£10)
- Littlefuse midi inline fuse-holder (£8)
- Four 125A midifuse (Three for spares in emergency) (£5)
- A suitable crimper with 50mm2 dies.
- 3:1 ratio glue-lined heatshrink
- HPDE sheet
- M8 positive battery terminal post
- Dis-car-nect negative terminal battery isolator
- Expandable braid
- Battery terminal covers
Are you ready?
If so, then lets get started with the install guide. Please navigate to the second page and lets get it.
Hello,
Looking at your boot/trunk mounted battery in your NC, your conversion looks far better than any other solutions from various vendors I have seen here in the States. It even looks more complete than the factory boot/trunk mounted battery locations in other versions of the MX-5 Miata!
I was wondering if you have additional photos and information (eg, actual routing position of the cable) that shows the installation from the boot/trunk through the passenger compartment, and also the connections in the engine bay. Thanks in advance!
Hello,
Your boot/trunk conversion for your NC MX-5 looks like one of the best shown on the internet, even rivaling the factory installations in other versions of the MX-5. I am curious, and no doubt other readers are, on how you routed the primary and secondary cables through the passenger compartment, engine compartment, and final connections to the starter and other items in the engine compartment. A description and additional photos in these areas would be really helpful to those of use who wish to replicate your installation. Thanks so much!
Hi,
I will in the future upload more photos in the engine bay. But put simply a 50mm2 through-crimp connects to the two cables that would go to the battery terminal. Essentially two cables join to one. I penetrated through under the oem wiring grommet.
EDIT 01/04/2023: I have since decided it would look neater and be far better to put the battery-cable through the firewall through a 32mm open grommet that has a 3mm thick groove to accommodate the rather thick firewall.
Hi Tod,
Sorry for the really late response. I’ve been sorting my own full turbo kit for this car. So has been very hectic. The main 40mm2 power wire runs underneath the fuel-neck filler shield (behind the plastics) (this shield was cut with tin snips, and I used some metal-spined weatherstripping to prevent it rubbing and chaffing the plastic conduit the power wire is inside). Anyways, it then follows past to the left gap where the oem wiring goes past the rear left shock and is cable tied onto the oem wiring alongside in (RHD case) the passenger (LHD driver side) kickplate area and up to the main firewall grommet. That should be of enough description to explain how to copy exactly how I did mine. I’ll upload more photos soon. This is my final revision of the best way to do the battery relocation on the NC chassis that I’m 100% happy with from a design point.